Well who would have thought that something that is spicy pickled cabbage would need to be specified vegan?
Before I answer that, welcome to Vegan MoFo (Vegan Month of Food) 2012! I’ve been participating for years, and thought this might be a good way to get back into more or less regular blogging. I do have a loose theme this year: Canning, Fermenting and Preserving. Canning and fermenting are more or less antithetical methods of preservation (killing all possible bacteria vs using good bacteria to keep things healthy), but I’ve been doing both. It’s fun! Plus, fermenting isn’t always about “preserving,” as in something like sourdough bread- but that’s for another day. Not everything will be a lesson or a recipe, but hopefully all (or at least most) of my posts this October will at least include something I’ve canned, preserved or fermented. And given the time fermentation can take- I’ve been working on some of these for a while. 🙂
Back to Kimchi.

Local napa cabbage.
Kimchi is traditionally made using shrimp paste (or fish sauce), so it’s not vegan by definition. I don’t know that it’s all that hard to find vegan versions, but if you’re buying it, you’ll have to read the label. And if you’re searching for recipes, you’ll have to be careful- most recipes do include our fishy friends.
I’m also more and more enamored with using local foods. Going to the farmers’ market is fun! It’s not always the cheapest way to make things, but when practical, it’s a nice way to go. All but the ginger, salt and Korean chili powder I used were from the farmers’ market for this batch.
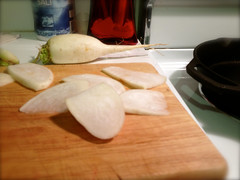
Baby daikon!
One of the really nice things about this was the difference in making this in the spring/early summer, and the late summer/early fall. Notably, the size of the vegetables. When I made this the first time, everything was so small! The daikon, the carrots, even the cabbage! Plus I was using the early spring garlic, rather than the the type we’re used to seeing in the supermarket.

Scallions in early spring are abundant!
A note about the Korean chili powder, or Gochutgaru. I have an H-Mart right down the street from my place- there was a section of aisle just dedicated to this stuff. I picked up one of the smaller bags, but you have options to buy it in ginormous quantities. You can just use hot chili peppers to your liking, or cayenne, but if you’re using cayenne, use a much smaller quantity (the Korean chili powder is fairly mild). I’m saying 2-4 Tbs in the recipe of Korean Chili Powder, but I found 2 to be too mild. Three hit the spot for me in my next batch.
So what to do about the fish sauce? Miso is an excellent substitute. I was worried that the bacteria in the miso would compete with the bacteria in the kimchi, but I found that it worked just fine. I’d try to make sure that you buy a brand that doesn’t have any weird preservatives in it. I used plain old white soybean miso, but I’m sure any variety would be just fine. You’re just replacing that umami flavor that our water-dwelling friends would impart. Speaking of which, I suppose you could also try seaweed in its place.
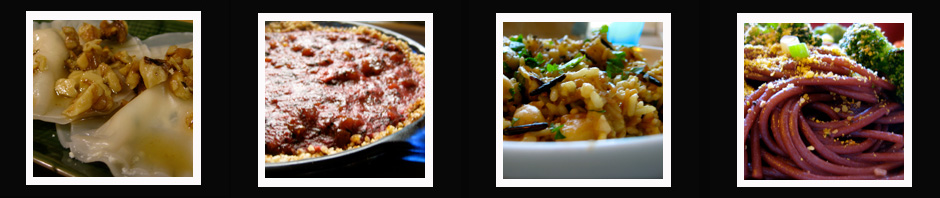
Kimchi makes for some awesome veggies added to pretty much anything you’d watch spicy/sour/fermented vegetables. It’s also a raw food! I like to add it on top of various tofu/noodle dishes.
I actually looked at a number of different recipes when I was trying to figure this out, and I winged it a little more on the second time. The two books I used to help me were Wild Fermentation: The Flavor, Nutrition, and Craft of Live-Culture Foods and Canning for a New Generation (not to be misled, the second book does NOT suggest that you water bath can this- it’s fine to go in the fridge as it). These were both non-veg recipes; the miso idea was courtesy of a google search for “vegan kimchi” (I don’t remember which link in particular, I’m afraid).

Don’t use this jar!
One last note, as you’ll see in the picture, I used one of these to ferment the kimchi. Don’t do this. You can, but you’ll make a huge mess. The pressure builds up, and you have to keep opening it to release the pressure, and in the meantime, the brine starts seeping out the seal and you have a mess everywhere. Plus, when you open it to release the pressure, you may have brine (harmlessly) explode in your face. Not a pretty sight. Do yourself a favor, and get a fermentation jar instead.
The fermentation jar has an airlock, so the pressure releases naturally without letting in any oxygen (important, since this is an anaerobic process. A little air won’t kill it, but the more you can keep out, the better). They’re reasonably cheap, and shipping’s not bad at all from Cultures for Health (and they don’t pay me anything- I just like them). You can’t really use that jar for long term storage (the other jar I mentioned is perfect for that, though), but you can then free it up for other fermenting projects! For this recipe, the half gallon jar should work fine, though you’ll probably have to pack it tight (which is a good thing).
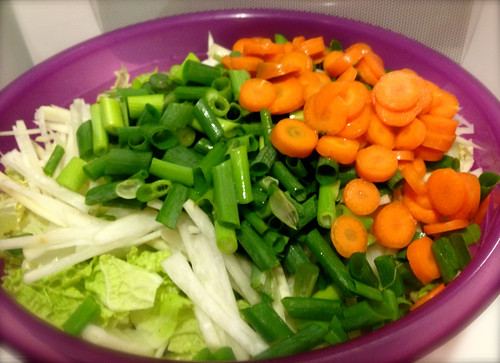
All the veggies, before they’re brined- you’ll want a really big bowl for this!
Vegan Kimchi
- 2 small or one medium head Napa cabbage (don’t get a gigantic one), shredded into bite-sized or a bit larger than bite-sized pieces (save one of the outer leaves intact, as well)
- 6-8 scallions; green parts snipped into bite-sized pieces, and white parts reserved
- 8 ounces daikon, peeled and cut into julienned strips
- 3-4 small(ish) carrots, peeled and sliced
- (you can add small amounts of pretty much any cut-up vegetable you like here as well, but if it has a thick skin, peel it)
- 1/4 cup Kosher salt (this salt must be pure salt, do not use salt with iodine or preservatives or anti-caking agents)
- 8 cups water
- 1.5-2 inches peeled ginger, grated or minced
- 4-6 cloves or garlic (or a small head of spring garlic)
- 1 Tbs miso (do not add more; it’s okay to add a a little less, or even to leave this out- you don’t want to be adding too much more saltiness)
- 2-4 Tbs Korean Chili Powder
- Add the cabbage, green parts of scallions, daikon and carrots (or other veggies) to a large bowl.
- In another bowl, add the Kosher salt to the water and dissolve; then pour over the veggies. Put an upside-down plate or a pot lid over the veggies to keep them submerged. Let sit for 8 hours.
- Drain and reserve brine. Return veggies to bowl.
- Add the ginger, garlic, miso, scallion whites, and chili powder to a blender or food processor, with enough of the brine to process (about a 1/4-1/2 cup. Start with less!).
- Get your hands dirty: pour the paste into the veggies, and mix it in well. All of the veggies should be coated with with the paste, and look a pretty red color. You can add a little more brine if needed.
- Pack the veggies into the fermentation jar* well. Pour enough of the reserved brine into the jar to make sure that everything is under the brine. Use the reserved cabbage leaf to put flat on top of the veggies to help hold everything under the brine. Cover the jar and put on the airlock.
- Leave at room temp for about four days. Taste. If it’s not sour enough, leave it out longer, tasting every day until it’s right (or very close to right).
- Transfer using a clean, dry, utensil to a vessel you can keep covered in the fridge (no air lock). It will continue to get a little bit sour in the fridge, but not at nearly as fast a rate as on the counter. Alternately, if you have a root cellar or other cool place to keep this, you can keep it there.
- It’s ready to eat at this point! To keep things hygenic, I find it’s best to use a clean pair of tongs to get the kimchi out of the jar, especially if you think you might have it around for a while.

On M*A*S*H, Frank Burns thinks this kimchi pot is a bomb!
*You can pack the veggies right into an airtight jar like I did and burp it every day, a few times a day. You absolutely MUST burp it a few times a day, or you may end up with exploded kimchi all over your kitchen. If you go this route, you’ll also want to fill a resealable bag with salt water and put it on top to help with the airlocking process.
As for storing, kimchi keeps for a really long time in the fridge, and is an ideal candidate for a root cellar as well. Traditionally, it’s buried in a fermentation crock underground, but I don’t think you want to go to this trouble- out on the counter for a few days and then into the fridge is the way to go, especially if you’re an apartment dweller like myself. I’ve found that it’s fine in the fridge for at least a couple of months, but your milage may vary. If you do decide that you want to do a slower fermentation in a cool spot (like underground), you’ll need to add more salt, but how much more I’m not sure.
Happy Vegan MoFo and happy World Vegetarian Day!

Pingback: 5 Vegan Food Prep Tips for TV Time | The Picky Vegan
Pingback: Round-Up: Yes We Can! | VeganMoFo
Pingback: Vegan MoFo posts you can use: Week 1 {Vegan MoFo #5}
Pingback: Make Your Own Raw Unfiltered Apple Cider Vinegar | The Picky Vegan